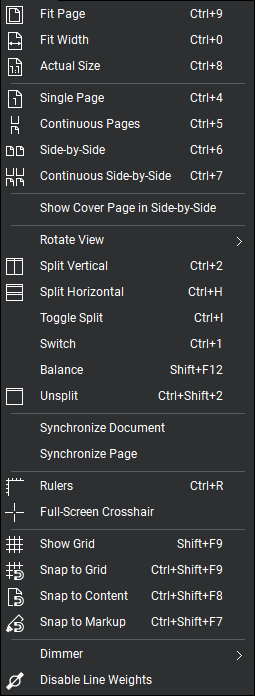
View Menu
The View menu contains commands to change the look and behavior of the workspace. It is accessed by clicking View on the Menu bar.
 Fit Page
 Fit Width
 Actual Size
 Single Page Mode (
 Continuous Mode (
 Side-by-Side (CTRL+6): Shows two pages side-by-side per window with the even page on the right and the odd page on the left. If Show Cover Page in Side-by-Side is enabled, the first page will be shown alone and the rest will exhibit this behavior.
 Continuous Side-by-Side (CTRL+7): Shows all pages in the side-by-side mode in one continuous window. If Show Cover Page in Side-by-Side is enabled, the first page will be shown alone and the rest will exhibit this behavior.
Show Cover Page in Side-by-Side: When enabled, causes the first page of a multi-page PDF to be shown on its own when one of the side-by-side displays is selected.
Rotate View Menu
 Rotate Clockwise
 Rotate Counterclockwise
 Split Vertical (
 Split Horizontal (
Toggle Split (CTRL+I): Toggles between vertical and horizontal orientation for the current split.
Switch (CTRL+1): Puts the active document tab in the last active split and removes it from the current split.
Balance (SHIFT+F12): Sets all splits to equal size.
 Unsplit: Eliminates the current split.
Synchronize Document: When enabled, synchronizes the viewing windows when displaying PDFs in side-by-side Split View mode or in a detached window by page index, thus viewing page 1 on document A will cause document B to automatically also view page 1.
Synchronize Page: When enabled, synchronizes the viewing windows when displaying PDFs in side-by-side Split View mode or in a detached window without regard to page index, allowing the user to synchronize different pages across documents or different pages in the same multi-page document.
 Rulers: Toggles the rulers on and off. Rulers appears along the top and left edges of the workspace. Right-click on either ruler to choose to measure in Inches, Centimeters, Millimeters, Points, or Picas.
The rulers have several useful features:
- Shows the bounds of the active page.
- Highlights the space occupied by a selected element of the page.
- Grouped annotations show as one highlight.
- Only the textbox area of callouts are highlighted.
- Flattened elements are not highlighted, nor are Notes or Attachments.
- Shows the current position of the mouse pointer.
- Scales according to zoom.
- Shows the position to be snapped to when snapping is enabled.
 Full-Screen Crosshair: When enabled, the cursor is replaced with full-screen crosshairs in the main workspace, drawing vertical and horizontal lines across the document that meet at the mouse pointer. The color of the crosshairs is the same as the Snap Color defined in the Grid & Snap Preferences.
 Show Grid
 Snap to Grid (
 Snap to Content (
 Snap to Markup (
Dimmer: The Dimmer menu contains tools to control dimmer effects on the content layer of the PDF in order to better see annotations.
Dim Content (CTRL+F5): Toggles the dimmer effect on or off.
0-100%: Set the level of dimming as a percentage. The lower the percentage, the less intense the underlying PDF will appear compared to the annotations.
 Disable Line Weights: When disabled, Revu uses the line weights defined in the PDF when showing documents in the workspace. When enabled, a method will be used to determine an optimal line thickness based on the screen resolution and zoom factor of the workspace.