Appearance Toolbar
By default, the Appearance toolbar contains tools for defining appearance settings of selected markups. Tools commonly found on this toolbar are described below. The exact tools a user will see depends on their Profile and might not include all the tools mentioned here. For a complete list of tools that can be placed on a toolbar and more information about customizing them, see Tools and Toolbars.
If the toolbar is currently hidden, go to Tools > Toolbars and select it to show it.
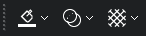
 Fill Color: Opens a color selector to define the fill color of the currently selected markup. The rectangle under the bucket icon denotes the currently selected color.
 Opacity: Opens a selector to change the opacity for the currently selected markup in 10% increments. A setting of 100% makes the markup completely opaque and a setting of 10% makes the markup nearly transparent. Values in-between define various levels of transparency. To set the opacity to a value not available in the menu (for example, to 45%), right-click the markup and select Properties to open the Properties tab and enter the desired value in the Opacity field there.
 Hatch Pattern: Shows a list of available hatch patterns that can be used to fill the selected markup.